Last reviewed: 20th August 2026
Quick Answer
By adding a sender address to the Safe Senders List, you can prevent the valid emails from being marked as junk. By incorporating unwanted senders addresses into the Blocked Senders List, you can also prevent them from being sent. From the Junk folder or Outlook settings in Classic Outlook, New Outlook, and Outlook on the Web, we can do this.
Steps to Safelist a User in Outlook Classic
Step 1: Open Outlook
Launch the Outlook application.
Step 2: Open the Junk Email Folder
Locate the email from the sender you want to trust by going to the Junk Email folder.
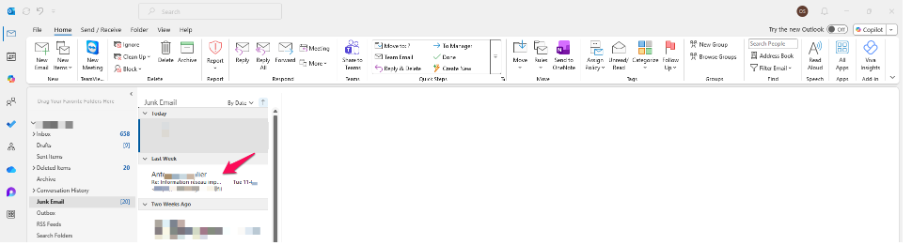
Step 3: Right-Click the Email
Right-click the email message.
Step 4: Mark the Sender as Safe
Select Junk > Never Block Sender.
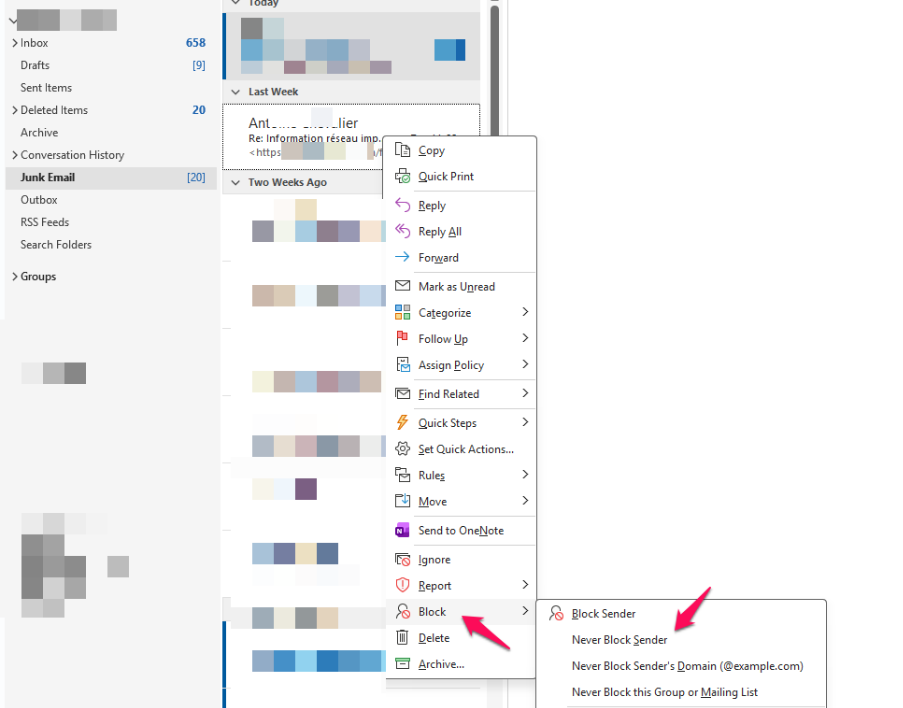
Step 5: Verify the Sender is Added
Future emails from this sender should be delivered directly to your Inbox.
Steps to Blacklist a User in Outlook Classic
Step 1: Locate the Email
Please open the email from the sender you wish to block.
Step 2: Right-Click the Email
Right-click the message.
Step 3: Block the Sender
Select Junk > Block Sender.
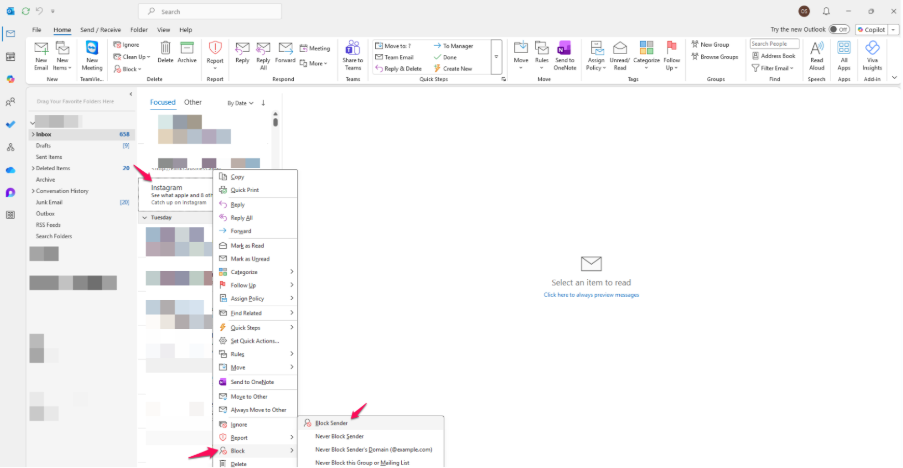
Step 4: Confirm the Action
The email will be categorized as Blocked Senders, and any future emails will be moved to the Junk Email folder.
Steps to Safelist a User in New Outlook
Step 1: Open New Outlook
Launch the New Outlook application.
Step 2: Open the Junk Email Folder
Find the sender you want to safelist.
Step 3: Select the Email
Select the message and look on the top toolbar for the … (more action) menu.
Step 4: Mark as Not Junk
Select Report > Not Junk or Never Block Sender (depending on your Outlook version).
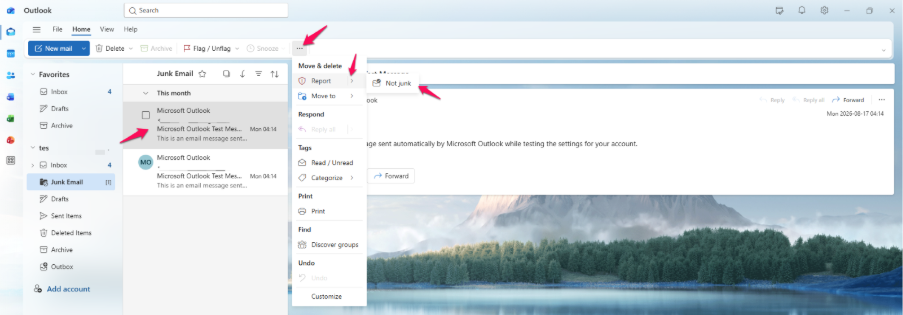
Step 5: Confirm the Action
The email will be included in your Safe Senders list.
Steps to Blacklist a User in New Outlook
Step 1: Locate the Email
Open the sender you want to block.
Step 2: Select the Message
Select the message and look on the top toolbar for the … (more action) menu.
Step 3: Block the Sender
Select Block > Block Sender.
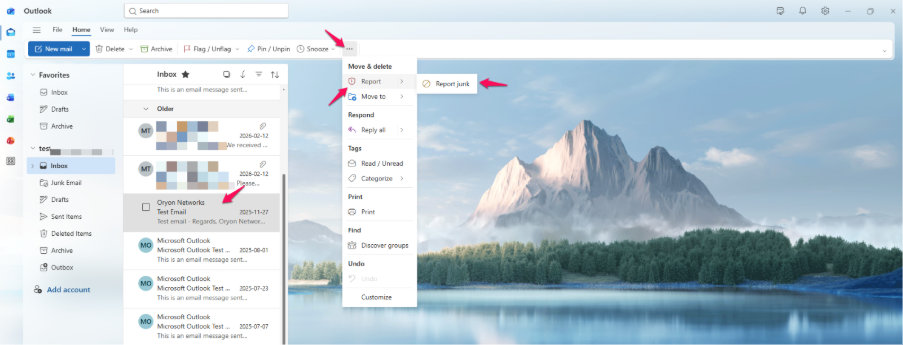
Step 4: Verify the Sender is Blocked
Later, future emails from this sender will be sent to the Junk Email.
Steps to Safelist a User in Outlook on the Web
Step 1: Sign in to Outlook Web
Open Outlook on the Web in your browser.
Step 2: Open the Junk Email Folder
Navigate to the Junk Email folder.
Step 3: Select the Email
Select the email from the sender you wish to trust
Step 4: Mark as Not Junk
Click Not Junk from the toolbar.
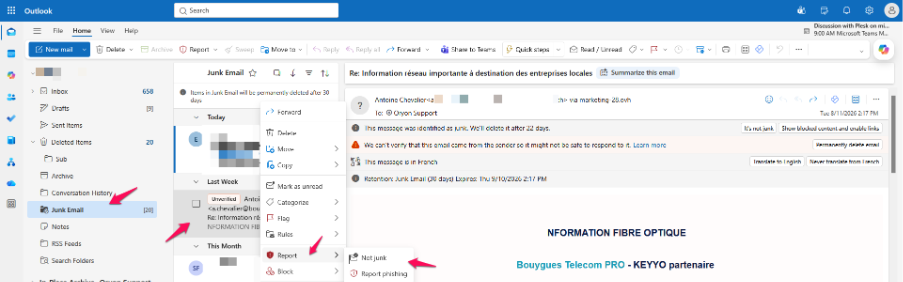
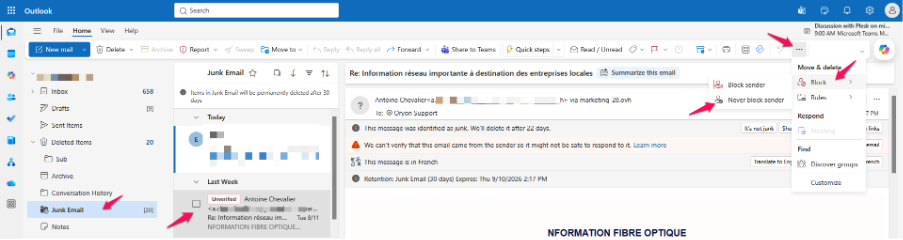
Step 5: Trust Future Messages
If asked, enable the option to always trust emails from this sender.
Steps to Blacklist a User in Outlook on the Web
Step 1: Open the Email
On your end, you can choose which email from the sender you want to block.
Step 2: Open More Actions
Click on the three dots (…) in the message toolbar.
Step 3: Block the Sender
Select Block and confirm the action.
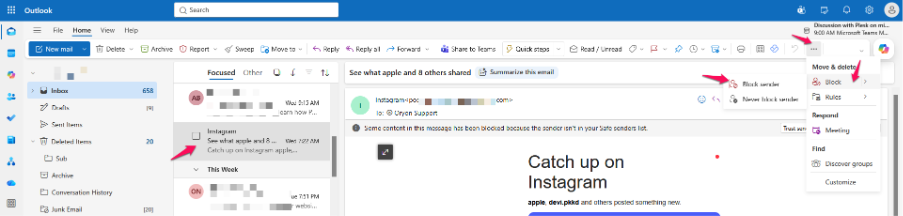
Step 4: Verify the Block
Finally, select the email from the sender you wish to block and send it to the Junk Email folder.
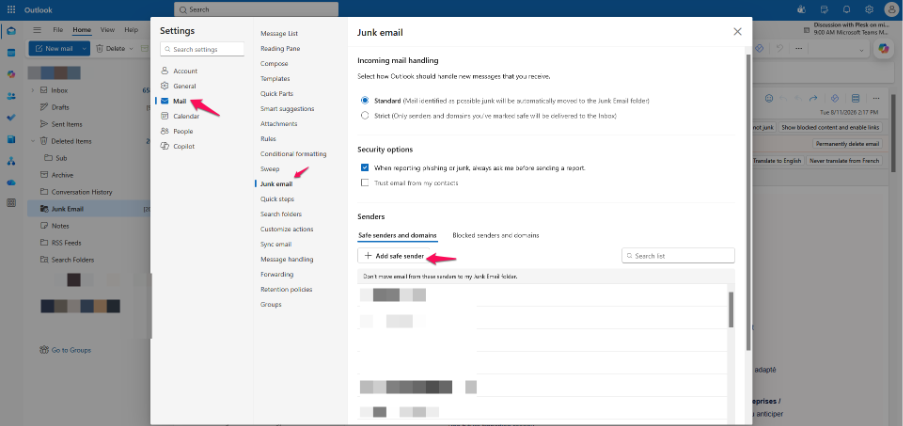
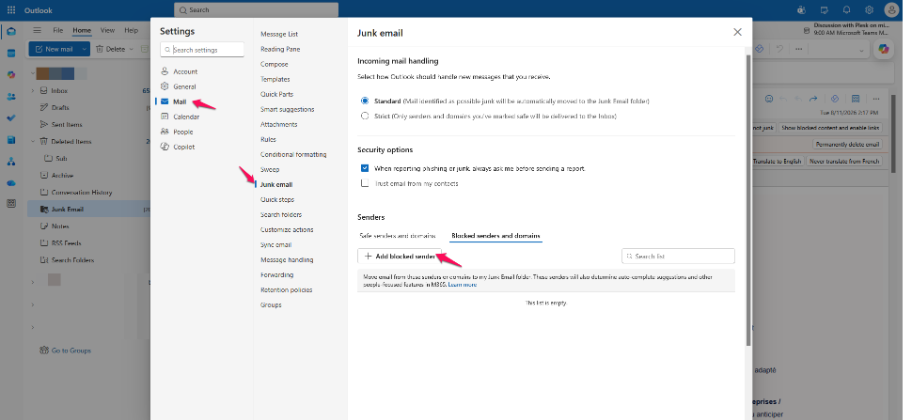
Another approach is to manage safe and blocked senders from settings.
Step 1: Open Outlook Settings
Select Settings (Gear Icon).
Step 2: Navigate to Junk Email Settings
Go to:
Mail > Junk Email
Step 3: Add a Safe Sender
To add the sender to the safe list, simply click on the “Add” button under Safe Senders and Domains.
Step 4: Add a Blocked Sender
To add the sender to the block list, simply click on the “Add” button under Safe Senders and Domains.
Step 5: Save the Changes
The sender’s email address or domain will be automatically move to the Junk Email folder.
Common Problems
Emails Still Going to Junk After Safelisting
- Make sure that the sender is not on the list of blacklisted senders.
- Check if any mailbox rules are moving the emails.
- Check that the sender was properly added to the list of Safe Senders.
Unable to Block a Sender
- Verify that the email address is valid.
- Restart Outlook and try again.
- Check whether your organization has mail flow rules overriding personal settings.
Safe Sender List Not Syncing
- Allow Outlook time to synchronize with Exchange Online.
- Sign out and back into Outlook.
- Confirm that Outlook is connected to the mailbox.
Blocked Sender Still Reaching the Inbox
- The sender may be using a different email address.
- Verify the correct address is listed under Blocked Senders.
- Check for existing Inbox rules that move messages to the Inbox.
Additional Information
Adding a sender to the Safe Senders list helps prevent legitimate emails from being treated as junk. Blocking a sender helps reduce unwanted emails by automatically moving messages from that sender to the Junk Email folder.
Need help managing Microsoft 365 for your organisation?
Oryon provides Microsoft 365 licensing, migration, email configuration and ongoing technical support for businesses in Singapore.